1. Magnetic Beads Method to Extract DNA from Whole Blood
Magnetic bead capture is the newest method of extracting DNA. Extracting DNA from whole blood using magnetic beads works by capturing DNA on silica magnetic beads for binding nucleic acid.
As with the precipitation chemistry methods, the whole blood cells first must be lysed using SDS or similar detergents. The lysed cells are then incubated with magnetic beads, allowing DNA to bind.
Several rounds of washing in the presence of a magnetic field then separates the DNA captured on magnetic beads from other unbound cellular contaminants. Then, a low-salt buffer elutes the DNA from the beads.
Some studies, including a review by Carpi et al., indicate that magnetic beads can be the fastest method. However, this speed comes at a price—both monetarily and to your DNA yield and purity. The magnetic bead approach can result in up to 20% reduction to your DNA yield. Also, any magnetic bead carryover contaminates your DNA sample and interferes with downstream applications. Lastly, it is the most expensive method because it requires magnetic capture stands, plates, and magnetic beads.
2. DNA Extraction Protocol —Precipitation Chemistry

DNA from whole blood using precipitation chemistry works by precipitating the DNA out of a lysate via high salt concentration and addition of alcohol (either ethanol or isopropanol). The precipitation chemistry method can further be subdivided into either one- or two-step lysis approaches.
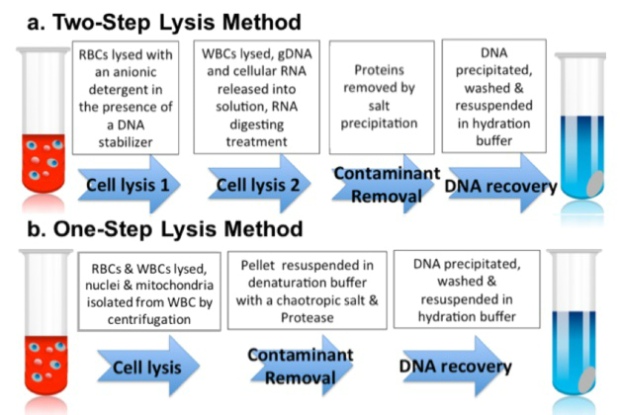
In the two-step lysis approach (used in Puregene kits), the first step lyses red blood cells using detergents, such as sodium dodecyl sulfate (SDS) and Triton™ X-100. Then, a second step is needed to lyse white blood cells to release their nuclei, genomic DNA, and RNA (Figure 1a). RNase treatment then removes contaminating RNAs, leaving DNA and proteins in the supernatant.
The next step is to remove the protein using concentrated salts, which precipitate proteins from lysed cells. As the cation concentration increases due to the addition of the salts and free water becomes less available, protein solubility decreases and causes the proteins to be “salted out.” However, the DNA remains in the supernatant, which is collected.
In the one-step lysis approach (which is used in FlexiGene kits), the red and white blood cells are lysed in one step; this works because a detergent mix capable of lysing both cell types is used. This lysis step releases the nuclei and mitochondria from the white blood cells, which are collected via centrifugation, leaving the RNA in the supernatant (Figure 1b).
Like in the one-step (Puregene) approach, the next step is to remove contaminating proteins. Here, the white cell nuclei and mitochondria are treated with a denaturation buffer, which contains a chaotropic salt and a protease. This simultaneously denatures and digests the proteins in the nuclei and mitochondria, leaving digested proteins and the genomic DNA in solution.
In both methods, DNA is recovered by alcohol precipitation and rehydrated using a Tris or Tris-EDTA buffer. Isolated DNA is stable at 4°C and -20°C for 10+ years.
The one-step lysis approach has a number of advantages over the traditional two-step lysis method.
Most importantly for your DNA yield, it eliminates possible sample loss that can be incurred in a two-step procedure.
No tube change is needed (i.e., for a manual procedure the risk of sample mix up is strongly reduced)
It saves you time in the lab not only because there are fewer steps, but also because there are no overnight incubations or clean up steps. The two-step precipitation chemistry method, for example, can take up to 48 hours to get the DNA into solution.
The one-step lysis approach is also friendly to your lab’s budget. It is less expensive because it doesn’t require extra enzymes, like RNase, or any additional equipment.
